
Requirement
Power Pages provides a flexible platform to build low-code, externally facing web applications on top of Dataverse. A common requirement in Power Pages applications is to perform operations on Dataverse records for example update a record using custom button. This is useful when we want to update related table record. In this blog, I’ll walk you through how to update a Dataverse record using a custom HTML button and JavaScript calling the Web API in Power Pages.
Details
To implement above requirement we need to perform following tasks:
Add WebAPI settings under Site Settings
While working with WebAPI in power pages we have to add following site settings.
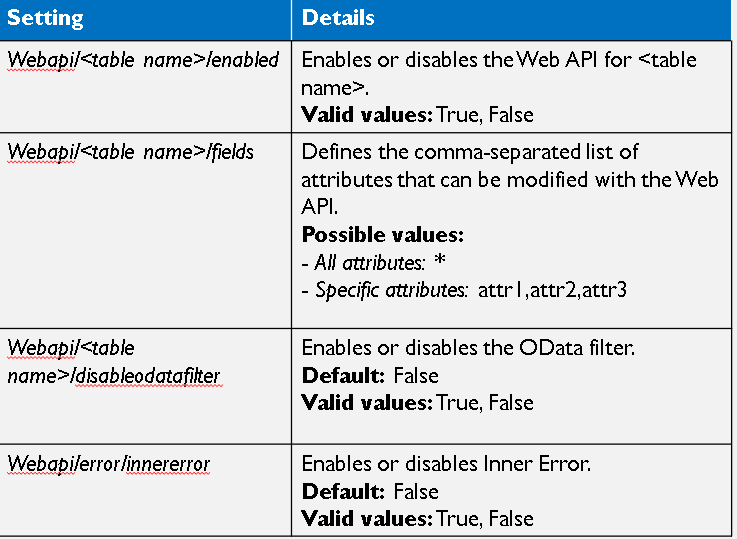
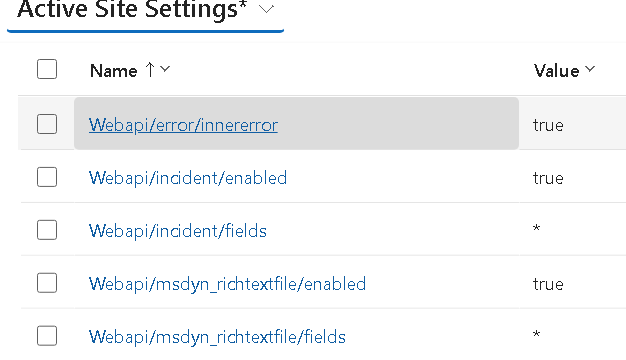
Using these settings we can add setting for our entity where we want to use WebAPI, for example in our case we want to use for the case (incident) entity so I have used following settings for the entity and field.
Make sure User have required Web Roles with Table permissions
When we want to access data in Power Pages we need to make sure, user have required web roles assigned and required table permission is configured.
Write Web API Request
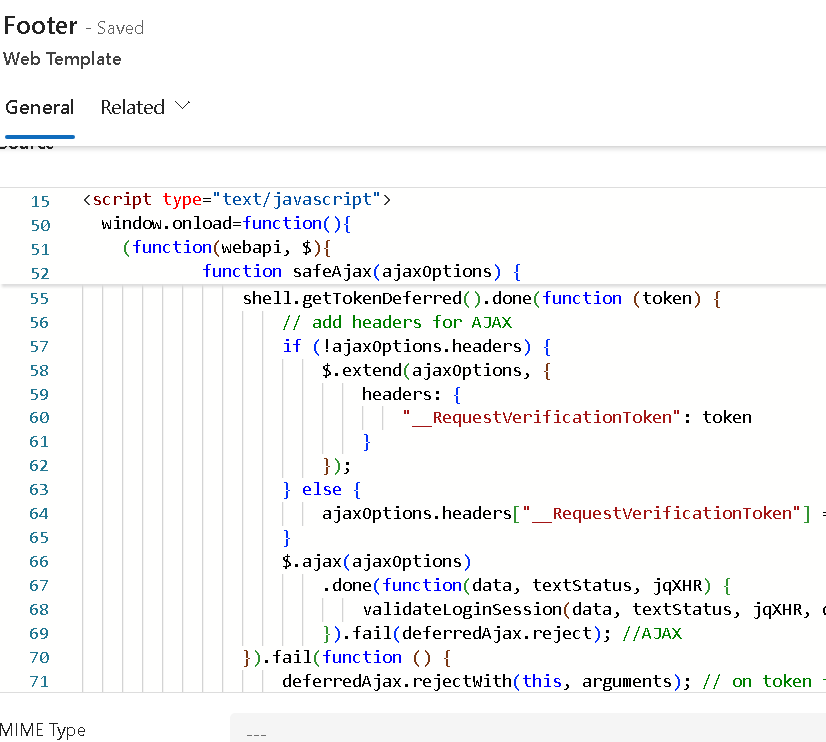
Now we can start writing Web API request, first we need to write a wrapper to get authentication token, Microsoft provided us a sample code which we need to use before making Web API call either we can include this before every Web API call or we can keep this in template so it will be available for us:
 window.onload=function(){
    (function(webapi, $){
            function safeAjax(ajaxOptions) {
                var deferredAjax = $.Deferred();
                        shell.getTokenDeferred().done(function (token) {
                    // add headers for AJAX
                    if (!ajaxOptions.headers) {
                        $.extend(ajaxOptions, {
                            headers: {
                                "__RequestVerificationToken": token
                            }
                        });
                    } else {
                        ajaxOptions.headers["__RequestVerificationToken"] = token;
                    }
                    $.ajax(ajaxOptions)
                        .done(function(data, textStatus, jqXHR) {
                            validateLoginSession(data, textStatus, jqXHR, deferredAjax.resolve);
                        }).fail(deferredAjax.reject); //AJAX
                }).fail(function () {
                    deferredAjax.rejectWith(this, arguments); // on token failure pass the token AJAX and args
                });

                return deferredAjax.promise();
            }
            webapi.safeAjax = safeAjax;
        })(window.webapi = window.webapi || {}, jQuery)

    };
I have used this code under footer template:
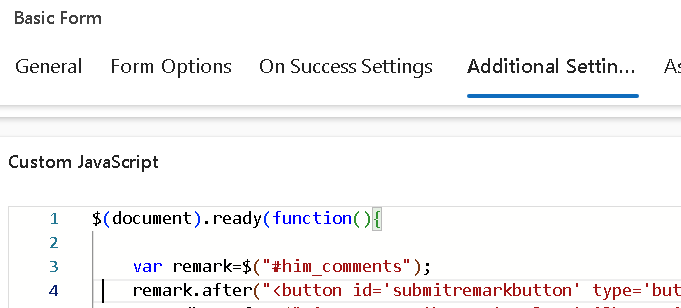
Now let’s take and example, In case entity I have add a custom text field called comments and I have added this field to edit case page where user can write comment and save record.
  var remark=$("#him_comments");
  remark.after("<button id='submitremarkbutton' type='button' class='btn btn-primary button' style='margin-top:20px;'><span></span>Submit Remarks</button>");

 $("#submitremarkbutton").click(function(){
     var record = {};
     record.him_comments =remark.val();

     webapi.safeAjax({
         type: "PATCH",
         contentType: "application/json",
         url: "/_api/incidents("+getQueryParameter('id')+")",
         data: JSON.stringify(record),
         success: function (data, textStatus, xhr) {
             console.log("Record updated");
             //clean value
             remark.val('');
             location.reload();
         },
         error: function (xhr, textStatus, errorThrown) {
             console.log(xhr);
         }
     });

    });
 function getQueryParameter(id) {
        var urlParams = new URLSearchParams(window.location.search);
        return urlParams.get(id);
    }
I have used this code under Case edit form like below:
After save and sync our changes to Portal we should be able to see this button in portal and on click of Submit Remark, our comments should be saved to Case entity.
Hope it will help someone!!
Keep learning and Keep Sharing!!