
This is our second article regarding virtual entity, if you have not checked our earlier article, we will suggest you to check that first here.
In this article we are going to demonstrate about create OData Web API without Entity Framework and hosting it in Azure to consume into Dynamics 365. Let say we have employees data that we want to show into virtual entity, so let’s get started!!
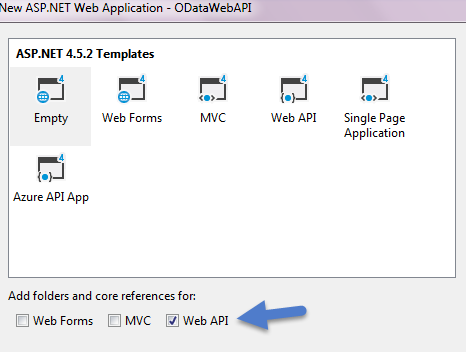
Navigate to Visual Studio and create ASP.NET Web Application project (File ->New -> select ASP.NET Web Application project under Web template)
Next select Empty template and make sure to select Web API under Add folders:
After that the first thing you need to do is to install NuGet package to get ODATA libraries, so you need to run following command under Package Manager Console (Tools->NuGet Package Manager -> Package Manager Console)
Install-Package Microsoft.AspNet.OData
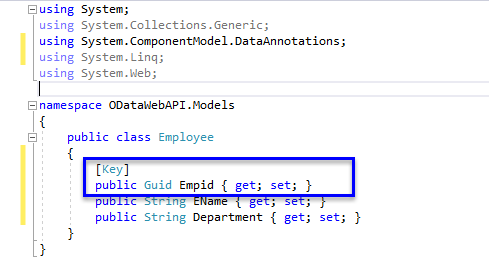
And once it is installed, let’s add our Employee class which will hold all properties for Employees under Models folder. We can properties based on our requirement but make sure there is should on provide which should match primary id property in Virtual Entity, so we need to define at least one GUID property which should act as a Key like following:
Now as we are not using Entity Framework, we need to define our data source class which will hold inline database for our Web APi, so let’s add a new Employeedb class, we can create a new folder under our Web Api project, let’s name it DB and add this class there. We need to add following code under this class:
using ODataWebAPI.Models;
using System;
using System.Collections.Generic;
using System.Linq;
using System.Web;

namespace ODataWebAPI.DB
{
    public class Employeedb
    {
            private static Employeedb instance = null;
            public static Employeedb Instance
            {
                get
                {
                    if (instance == null)
                    {
                        instance = new Employeedb();
                    }
                    return instance;
                }
            }
            public List<Employee> Employees { get; set; }

            private Employeedb()
            {
                this.Reset();
                this.Initialize();
            }
            public void Reset()
            {
                this.Employees = new List<Employee>();

            }
            public void Initialize()
            {
                this.Employees.AddRange(new List<Employee>
            {
                new Employee()
                {
                    Empid = Guid.NewGuid(),
                    EName = "Arnav",
                    Department="Dynamics 365/CRM"

                },
                new Employee()
                {
                    Empid = Guid.NewGuid(),
                    EName = "Diksha",
                    Department="Dynamics 365/CRM"

                },
                new Employee()
                {
                    Empid = Guid.NewGuid(),
                    EName = "Anil",
                    Department = "Dynamics 365 Operation"
                },
                new Employee()
                {
                    Empid = Guid.NewGuid(),
                    EName = "Sunil",
                    Department = "Dynamics 365 Operation"
                }
            });
            }
        }
    }
Now let’s add controller for our Web Api, we are going to implement just one method Get in our controller, to add controller follow Right Click on Controller->Add->Controller.

Under add controller dialog select our employee class and click on Add.
Delete all existing code and just add following code:
using System;
using System.Collections.Generic;
using System.Data;
using System.Linq;
using System.Net;
using System.Net.Http;
using System.Web.Http;
using System.Web.Http.ModelBinding;
using System.Web.Http.OData;
using System.Web.Http.OData.Query;
using System.Web.Http.OData.Routing;
using ODataWebAPI.Models;
using Microsoft.Data.OData;
using ODataWebAPI.DB;

namespace ODataWebAPI.Controllers
{
    /*
    The WebApiConfig class may require additional changes to add a route for this controller. Merge these statements into the Register method of the WebApiConfig class as applicable. Note that OData URLs are case sensitive.

    using System.Web.Http.OData.Builder;
    using System.Web.Http.OData.Extensions;
    using ODataWebAPI.Models;
    ODataConventionModelBuilder builder = new ODataConventionModelBuilder();
    builder.EntitySet<Employee>("Employees");
    config.Routes.MapODataServiceRoute("odata", "odata", builder.GetEdmModel());
    */
    public class EmployeesController : ODataController
    {
        public IHttpActionResult Get()
        {
            return Ok(Employeedb.Instance.Employees.AsQueryable());
        }
    }
}
Now finally we need to set routing for our Web Api, so let’s add following code under our WebApiConfig.cs file.
using System;
using Microsoft.OData.Edm;
using System.Web.Http;
using System.Web.OData.Batch;
using System.Web.OData.Builder;
using System.Web.OData.Extensions;
using ODataWebAPI.Models;

namespace ODataWebAPI
{
    public static class WebApiConfig
    {
        public static void Register(HttpConfiguration config)
        {
            config.MapODataServiceRoute("odata", null, GetEdmModel());
            config.Count().Filter().OrderBy().Expand().Select().MaxTop(null);
            //config.MapODataServiceRoute("odata", null, GetEdmModel(), new DefaultODataBatchHandler(GlobalConfiguration.DefaultServer));
            config.EnsureInitialized();
        }
        private static IEdmModel GetEdmModel()
        {
            ODataConventionModelBuilder builder = new ODataConventionModelBuilder();
            builder.Namespace = "Demos";
            builder.ContainerName = "DefaultContainer";
            builder.EntitySet<Employee>("Employees");

            var edmModel = builder.GetEdmModel();
            return edmModel;
        }
    }
}
Now we are ready to build our project and deploy it to Azure, if you don’t have Azure subscription, you can setup a quick Azure trial from here
Right click on our project and select Publish under popup menu. We need to select Microsoft Azure App Service, click on Publish button, if you are new to Azure, you can access rich Azure resource here to get started. If you are deploying to Azure for the first time it will ask you for signin use your windows Azure credentials. Once logged in, you can select your subscription, Resource Group, AppServicePlan and finally click on Create.

And once deployment is over make sure to browse below URL to get metadata and see if you are able to get it correctly.
YourAzureURL/$metadata
You should be able to see metadata like below:
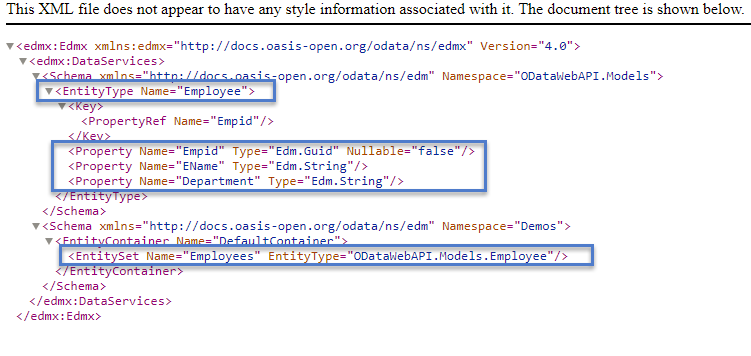
Keep not of highlighted information. After that we can try to browse below URL to see if we are getting employees information correctly.
YourAzureURL/Employees
After that we can create Virtual Entity data source by navigating to Settings->Administration-> Virtual Entity Data sources and selecting OData V4 Data Provider.

And now we can create Employee Virtual Entity, using our virtual entity data source, like below:

Make sure to add External Name to every field based on our Web Api field. Finally we can add our field to view and after publish we should be able to see our Virtual Entity records like below:

You can access complete code for this OData Web Api from GitHub Here.
Reference Post: http://www.odata.org/blog/how-to-use-web-api-odata-to-build-an-odata-v4-service-without-entity-framework/
Stay Tuned for more Dynamics 365 Updates !!
Pingback: Interessante Dynamics CRM Blog Posts KW 47 - Martin Tölks Dynamics CRM/365 Blog
Great Article!
If you define your navigation property virtual, Entity Framework will at run time create a new class (dynamic proxy) derived from your class and uses it instead of your original class. This new dynamically created class contains logic to load the navigation property when accessed for the first time. This is referred to as “lazy loading”. It enables Entity Framework to avoid loading an entire tree of dependent objects which are not needed from the database.
https://dipoletechi.com/blog-post/virtual-in-entity-framework/