In our earlier article we discussed how to create SLA and SLA items for account entity. Now in this article we will see how to use SLA for customer document verification. To work with SLA, we need to use timer control which provides us different option to evaluate SLA. We can configure different criteria which will display indication of warning, failure and success. So let’s follow below steps and add timer control on account form, if you are new to timer control, I will suggest you to refer this KB.
1. Open account entity form designer and place timer control from Insert tab. (Place Due and Document Verified field on account entity form as well, that we created in our last article)
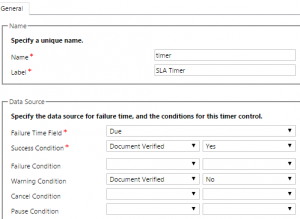
2. Configure time control dialog properties like following:

Failure Time Field: In this field we can set the field which we want to use as a dead line for timer, after that particular time, SLA will be considered as failed unless it is succeeded or cancelled in between. We are going to validate SLA against due field, select due field from drop down.
Success Condition: Here we need to select field which defines criteria for achieving SLA.
Warning Condition: Here we need to select field which defines criteria to start warning alert.
3. Save and Close dialog and publish account entity form.
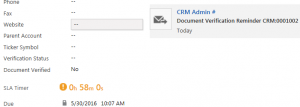
Now let’s create an account record. Once record is created, a reminder email will be generated after the SLA Item warning time and you can see timer display the warning time in orange color.

And if document verification is done within the time limit (means our document verified field is set to Yes), it will be change to Succeeded like below:

And if document verification is not done within the time than it will show time in red color like following and will show time that has elapsed since the action should have been completed:
![]()
This way we can use SLA for custom and system entities apart from CASE.
Stay tuned for more updates !!
